Wednesday, May 11, 2016

How to Rebuild SQL Server Database After a Failure

Overview

SQL Server plays an integral part of its users who creates their own database where they can store and retrieve data whenever required. Sometimes, the user may face issue while trying to access their database due to crash of SQL Server. To overcome such issue and to make the database accessible, we need to be able to make the database run on another physical server. For this, we can recreate the entire SQL Server environment on an existing server instead of building a new server and installing SQL again.

Things to keep in mind before Rebuild SQL Server Database

  • In order to recreate the SQL environment, we will use an existing SQL Server that is already setup.
  • Since the process involves restoring the master, msdb and user databases, we need to make sure that both the source and target SQL Servers must be on the exact service pack.
  • If the Source and Target environment are not similar, the restore of master database on the target server will not be possible.
  • To check the version of the target environment, use command ‘Select @@version’ in SSMS.
  • For version of Source environment, we can use a master backup file to check the SoftwareVersionMajor, SoftwareVersionMinor and SoftwareVersionBuild using the command ‘RESTORE HEADERONLY FROM DISK ='F:\Backup\master_backup_2015_10_9_000001_7422453.BAK'
  • Ensure that both the environments have the same version before beginning the rebuild process on the target server.
  • As an example for this page, we will use SQL 2008 SP2 (10.0.5000) for both source and destination.
  • In Source- master, model and msdb databases are located on drive D while tempdb is on a dedicated drive E with initial size of 10GB.
  • In Target- server has only one drive C without enough space to create 10GB file for tempdb.

Rebuilding SQL Server Database after a Failure

Here are the steps that need to be followed for rebuilding SQL Server database after a Failure:

  1. Shutdown the SQL Services like SQL Server, Agent, SSIS, etc. on the target SQL Server using SQL Server Configuration Manager.
  2. Go to command window by typing cmd in the search box. Use the command
    ‘sqlservr -m’
  3. Open a new command prompt to start SQLCMD and use the following command to restore the master database:
  4. The instance of SQL Server, which was started in single user mode stops after the completion of master database restore. While trying to run ‘sqlservr -m’ again, SQL Server will not start as master database has the reference that model and msdb are on drive D and tempdb is on E drive. Since the target server does not contain Drives D and E, we will use the following command:
    ‘sqlservr –c –m –f –T3608’
    Where -c >> Starting SQL not as a service
    -f >> starting with minimum configuration
    -T3608 >>trace flag 3608 will skip automatic recovery of all databases except master database
  5. We can change the location of the model and tempdb by using below commands after starting SQLCMD. We can also resize tempdb as well.
  6. We will stop the SQL Server from the CMD window by either closing it directly or using CTRL+BREAK. Restart the SQL Server with the help of SQL Server Configuration Manager.
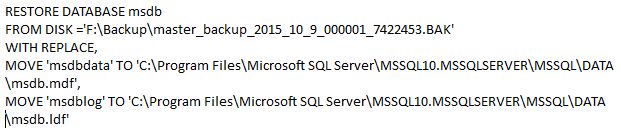
  7. We will run the following command either on SSMS or SQLCMD to restore msdb database
  8. In the end, we will restore the user databases and start the SQL Server Agent.

Conclusion

In the blog, we have been discussing ways on how to rebuild SQL Server database after a failure using existing server instead of creating a new one. After restoring the master and msdb databases, we were able to recover all the system information such as logins, schedules, jobs etc. without the need to recreate them. This method saves time since we do not need to build the entire server and install SQL Server all over again. However, if this methods fails to rebuild SQL Server Database then you can also take the help of third party utility like SysTools SQL Recovery

Tuesday, March 29, 2016

MS Build 2016 Live Streaming


Monday, March 28, 2016

Know How to Manage SQL Server Error Logs

The SQL Server error log file contains an account of the entire information generated in SQL Server. It contains warnings, informational messages, and information about critical events that take place in SQL Server. Furthermore, important information, like success and failure of logon events user-generated messages also get stored in the SQL Server error log. Since it is a valuable data point for the SQL Server administrators, managing the size of the error logs is the most important thing that needs to be done.

Every time, the SQL Server instance is started, the error log is initialized. In case the SQL Server instance has not been stated from a very long time, the error log can grow to a very large size. However, management of SQL Server error logs helps in maintaining the size of error log under control.

In this write-up, we will discuss some of these methods by which an administrator can manage SQL Server error logs effectively.

Methods for Managing SQL Server Error Logs

There are many methods, which can help the administrators to manage the SQL server error logs effectively. Some of them are:

  1. Reinitialize SQL Server Error Logs
  2. In order to reinitialize the server, the stored procedure sp_cycle_errorlog can be used. This stored procedure closes current error log and like a server restart, cycles error log extension. The new error log file will contain the version and copyright information and a line that will indicate that a new log is created.

    Each time, SQL Server is started, the error log file is named to errorlog.1, and then errorlog.1 becomes errorlog.2 and so on. The syntax sp_cycle_errorlog cycles the error log files and that too without stopping and starting the server.

  3. Increase Number Of Error Logs
  4. The second method by which an administrator can effectually manage SQL Server error log files is by increasing the number of error log files for a specific instance. There are seven error logs by default in SQL Server, which are stored in the log folder. For better management of error logs, the user might want to create more than seven log files. This can be done by adding a registry key in the registry editor. Before making any changes in the registry, it is advised to create a backup of the entire data.

    Browse to the following location in registry editor.

    HKEY_LOCAL_MACHINE\SOFTWARE\Microsoft\MSSQLServer\MSSQLServer

    Create a key with the name NumErrorLogs of value REG_DWORD type to it. Double click on it and change its value data to the number of extra error logs you require in SQL Server.

  5. Limiting Error Log Size
  6. Limiting the size of error log file is another method with the help of which the SQL Server error logs can be maintained. In SQL Server 2012 and subsequent versions, following mentioned script can be run to manage the size of an individual error log file.

Conclusion

With the help of the above-mentioned parameters, a database administrator can easily manage SQL Server the error log files.

Sunday, October 18, 2015

Step by Step SSIS Multicast Transformation TIP #121

Dear Friends,

This is another post in the series of step by step SSIS ,Zero to hero series. In this post we will discuss another transformation control which is Multicast transformation.

Multicast is a way which help us to provide multiple copy of same source data for different transformation. Or in other words we can say multicast transformation create multiple pipelines for the same data.

Lets understand this by an example. Suppose, we are product developer and selling product in different state in India. Now ,the problem is same product may have different selling price due to different tax system. So, we have to use same data of product but there will be different discount according to sate tax.

Now, here we go step by step. for your information in this example we are going to use similar example which we did in last post of Derived column Transformation tip #120

Step 1:- Add a package and drag drop data flow task and configure source database. I am taking Adventurework2012 database and using product &  productCategory tables for source data query below is simple snap of data

Data1

Step 2:- Once the data is configured. Drag drop Multicast control  as shown in below figure and give output of source object to Multicast and try to configure it.

DragDropMulticast

Step 3:- Now, when we have configured Multicast we can get multiple output from Multicast control. Suppose , One state is taking 10% WAT tax, another state taking 20% WAT tax and last one is taking no tax (wow that’s great). So we can drag drop derived column and configure then according to 10% ,20% WAT tax for reference you can take a look of tip #120 

I configured the the 3 different output in same way and adding the respective flat files. As shown in below figure you will see we added 3 files

1) with 10% ,with 20 % and without and tax

FileDestination

After configuration you will get structure something like as shown in below image. As a result we will get 3 flat files with 10% ,20% and without any change.

finalDesign

Step 4:- If you face any difficulty in Derived column configuration and moving the data to file please follow earlier post. Now once everything is configured run the package by pressing F5 or hitting run button you will get following screen. So , if you see Multicast providing similar row count to different output which is 295 rows.

Final_Result

We , can use this Multicast where we need multiple copy of same source data.

I hope this article might help you somewhere.

Enjoy !!!

RJ !!

Step by Step SSIS–Derived Column Transformation TIP # 120

Dear Friends,

In the series of Step by Step SSIS , Zero to Hero in SSIS this is another post in which we will try to understand what is Derived Column Transformation.

Let’s understand this by a real world example. Suppose, we are a shop keeper and our work is buy things from carpenter and sell them by adding our 20%  margin.

So , carpenters give us source data (file, sql server etc) with their rate according to product. What we do actually ,we add another column in our register by adding 20% which is our selling price. So ,our selling price column is a derived column here which we derived from source by adding some of our operations.

Isn’t it simple ?

Let’s understand this now step by step. I am using Adventureworks2012 database here as a source database and using product & ProductCategory table combination query. So , Assume this source data is data of carpenter’s products.  Here if you see below image we have productId, Product Name, color,Category & ListPrice (price at which we (Shop Keeper bought the the product)

Data1

Step 1:- It is useless to say here add a new Package in your project. Drag drop data flow task on canvas. Now double click the data flow task you will get a new screen where you need to drag drop source Assistance.

Now,need to configure source assistance where database will be adveturework2012.  If you see below we have same columns which we shared earlier in figure

SourceColumn

Step 2:- I am sure you will not face any problem in configuration of source control. Now in step 2 we have to drag drop Derived column.  Once you drag drop derived column you need to provide output of source assistance to Derived Column Transformation. Now to configure this use context menu by right clicking and choose Edit option you will get below screen. Here we have different functions and operators which we can be utilized with columns and variables and parameters to create derived column.

DerivedColumnSettings

If you see above highlighted row in image we can add a new column or can replace any existing column as shown in drop down.

Step 3:- If you see there is expression column also where we can add custom expression. Here we are multiplying 0.20 in list price and adding it again in Listprice and aliasing this new column SellingRate as shown in below figure

Expression

if you see below screenshot we can add other functions ,operators also.

VariousOpeartors

Step 4:- I hope above steps are pretty much clear. Now add a destination file in which we will get derived column “SellingRate” . We have to configured the derived column. As shown in below figure we configured derived column.

SellingRatemapping

Step 5:- Now, Once the destination file is configured run the package by pressing F5 or clicking run option. If everything working fine then we will get all the green checkbox sign as shown below figure

FinalResult

I hope this post might help you to understand the derived column.

Enjoy !!!

RJ!!!

Saturday, October 17, 2015

Step by Step SSIS–Union ALL Tip # 119


Dear All,

In the series of  zero to hero SSIS series this is one of the simplest transformation control which known as UNION ALL. 

As you might aware UNION in general term  which means collective. In SSIS UNION all control is doing the same task.

It collect all the inputs may be of same type of sources or different type of sources and  union them all and provides single output for the same.

Lets understand this by below example.

Suppose, We have different text files which contain fruits &  vegetables name. Now our aim is to combine all the fruits and vegetables name which exists in these files.

if you see below image you will find 3 files which FruitA (Contains fruit names start with letter A) , FruitB (Contain fruit names start with  letter B), FruitP (contains fruit name start with letter P)

Files Now we need to combine this file using UNION ALL transformation. So follow below step by step

1) Step 1:- Step 1 is simplest step and now you all well versed in this. We need to add a new SSIS package file and drag drop  data flow task .

2) Step 2:- Now add different flat file source for all the 3 files and configure all the 3 files  fruitA.txt, fruitB.txt , fruitP.txt .

3) Once we configured all the 3 flat file sources, We have to drag drop UNION ALL transformation control.Once we drag drop UNION ALL we can provide the output of all the 3 files as a input in UNION ALL control as shown in below  figure.

source

Step 4:- Now, we have to configure the UNION ALL control. To do this right click on UNION ALL control and click on EDIT option. Here we have to configure all the columns which we need to union.

ConfigureUnionAll

Step 5:- Once the UNION ALL is configured our next step is to get the output of UNION ALL in a resultant file. for this we have to drag drop destination flat file control as shown in below figure.

file

Step 6:- Now we have to configure the flat file destination and save it to specific location. A part from this we have to provide input to flat file destination which will be output of UNION ALL control. As shown in below figure I am saving the file on same location and giving name finaloutput.txt

finaloutput

Step 7:- Once all the above step is processed by us the final step is to run the package for this just click on RUN icon or hit F5. If everything is working fine the we will get following  result with all the green right check images.

finaloutputREsult

If you see above image we did union of all the 3 files and saved output in a single file.

Now, for learning purpose and to make the post simplest I use only same type source you can use different type of source and destination as per your need.

A part from this UNION ALL doesn’t remove duplicate so if there are duplicates in the files it will not remove.

I hope this article will help you somewhere.  Please provide your inputs.

Enjoy !!!

RJ!!!

Friday, October 02, 2015

Step by Step SSIS–Aggregate Transformation TIP #118


Dear Friends,

In the series of step by step SSIS tutorial this is another post. In this post we will see Aggregate Transformation. I am pretty much sure you are aware of aggregation. Although , Just wanted to share that aggregation operation in generally memory expensive operation.

So, whenever you want aggregation & want to use group by function then in such situation you can use Aggregation transformation.

There are different group by option available like MIN, MAX , COUNT, SUM, AVERAGE etc.

Let’s understand how to use Aggregate transformation step by step.

For current example we are using Adventureworks database and we are using below query. Here we are fetching the product data with line total,unit price  & other details.

Data

if you see the records in the table you will find that there are multiple records for same product with different line total.

Our objective is to aggregate or do sum of Line total according to Line Number and export the result in a csv.

Step 1:- So , Now start with package creation add a new package in solution and drag drop source Assistant and configure the database connection as we did earlier in the tutorials

Step 1.1 – Drag drop  Data flow task

Step 1

Step 1.2 – double click data flow task  and drag drop source assistance control

Step 1.1

Step 1.3 – Configure source assistance

Step 1.2

Step 2: Once the source assistance is configured with SQL SERVER connection string and specific query we will drag drop Aggregate Transformation control as shown in below figure

Step2

Step 3:- Now configure this aggregate control. So Just right click aggregate control and select Edit option. Now as we require Sum of LineTotal so we have selected SUM in operation column’s drop down and rest other has drop down option group by.


Step3

Step 4:-

Now, drag drop flat file destination and configure it.

Step4

Now configure flat file  with mapping as shown in below figures

Step 4.1

Step 4.2

Step 5: Now run it you will get desire result as shown in below figure

Result

If you see in the result we got 757 rows after processing 121,317

Now see the result in actual as shown in below file

File

I hope this example might help you to understand Aggregate transformation. Please provide your inputs.

Enjoy !!

RJ!!!

Monday, September 21, 2015

Step by Step SSIS - Conditional Split Transformation TIP #117

In the series of Zero to Hero in SSIS this is our next post. In this post we will see Conditional Split transformation.

I am pretty much sure that by the name you got some impression what it would be.

So, a Conditional Split Transformation is a way by which you can conditionally split an input into multiple output.

Suppose, You are a food supplier and you cook both veg & non veg food. Now according to orders by client you need to move those order requests to particular kitchen to prepare those orders.

Let’s understand it by following step by step execution example.

In this example , I am using AdventureWorks database as a source database connection. We are fetching products along with categories. We need Bikes products in different file and rest other product in different file. You can see products with categories shown below in this image Accessories , bikes are the categories.

Query1

Step 1:- Create a  new package and drag drop data flow task control and double click it. You will get a new screen which data flow task. Now drag drop Source Assistance. from SSIS controls tool bar.

Step1

Now as usual we have to configure the database connection string and set the database to adventureworks.

step2

Step 2:- Once the database is configured right click on control and choose edit property. You will get below screen where you need to specify the query which we shown earlier in figure.

step3

Once you done with above steps you need to configure columns as well so, click on Columns and configure it.

step4

Step 3:- Now drag drop conditional split and connect input arrow to it as shown in figure

step5

Step 4:- Now choose edit option by right clicking the conditional split and configure it.  When you click you will get screen like below. You will find different condition operator. One important point to remember here you need to drag drop column name to condition textbox.  As our aim is to have product with Bikes category in a different file and other categories in different file.So we use following condition as shown in below figure.

step6

Step 5:-Now drag drop a flat file destination and assign the output of the above conditional split to File destination. You will get following screen. As you see we are assigning Bike condition output to this file which means all the products which belongs to bikes categories should be available in this.

Step7

Step 6: Now Configure the flat file destination by choosing the edit option.

step10


Step9

Step 7:- In similar way we have to capture the output which not belongs to Bikes category as shown in below figure

step8

Step 8: In nutshell we will get following screen

step11

We almost done here. Now to check whether this conditional split is working or not. To check this hit F5 or run the package. So, if you see below everything working fine. We got 32 rows in bike category and 73 rows in other categories.

Step12

To cross check result we will see the file output as well

BikeCategories

So , If you  go through all the above steps we have achieved Conditional split example.

I hope this post might help you to understand conditional split.

In next step we will go for next step in SSIS.

Enjoy !!!

RJ!!!

Sunday, September 13, 2015

Step by Step SSIS learning What Data Conversion use in SSIS ? TIP#116

Dear Friends,

In the series of step by step learning of SSIS this is part #6 in which we are going to learn a new control Data Conversion.  I am sure by the name it clear that this control will be use when we require data type conversion of input columns then we need this control. This is exactly same like CONVERT  or CAST  in our programming.

Although, Here it would be important to share SSIS also have data type which are similar to other programming or database’s data types

Like DT_NUMERIC is equivalent to numeric data type, DT_I2 is equivalent to smallint, DT_str is equivalent to VARCHAR and so on.

I am sure you will find this control fairly simple so without wasting much time lets start step by step.

For a change I am using excel data source here.

Suppose, we have an excel of sales order which have columns like sales order, subtotal,Tax amount, and freight.

SaleOrderExcel

Here sales order is varchar, while SubTotal , Tax amount & Freight are numeric with decimal 4 places. We want to convert the numeric field in integer and want result in a flat file. so let’s start.

Step1 :- Drag drop a Data flow Task control and double click it. Now add an excel data source from SSIS tool bar as shown in below figure.

ExcelSource

Step 2:- Now next step is to configure this excel source. so to do this just right click and use EDIT option. You will get a screen where you need to provide the file which we want to access.

ExcelSourceStep2

Once the connection with excel is established the Next very important step is to configure sheet as highlighted in below figure. remember you need to configure this sheet because an excel may have number of sheets available so you need to assign proper sheet whose data you want to process.

ExcelSource3

Step 3: Once the sheet is configured you can choose the columns as well which you want to process or want in destination by click column’s option in as shown in below figure

ExcelSourceColumn

Step 4:- Now drag drop the data conversion control from SSIS toolbar

dataConvrsionControl

Step 5:- Now , open context menu and click edit button to configure data conversion. Now remember here we have to change data from numeric to integer (As discussed earlier our aim). so just change the desire data type which is integer (DT_I4) of all the three numeric data type. As shown in below figure. Also , point to remember here if when you do data type conversion you need to careful about Aliasing also. You will see copy of as a prefix on column.

Convesion

Step 6:- Now, we need this output in flat file so adding a file destination control from SSIS toolbox and configuring it by clicking Edit button as shown in below figure.

FlatFile

Step 7:- In next step we have to configure the file location and columns which we require in the flat file. And delete unnecessary columns which are not required.

deleteAccesscolumns

dataConvesionmapping

Step 8 : Once the above step is done, we are good to go to run this package. So,hold your breath for few second and hit F5 Smile .

You will get find below screen. Which shows that all the provided rows are inserted in file. 

result

Step 9 : To cross check whether file has integer columns or not lets open it.

CSVREsult

So, if you see above screen we did it successfully. So we achieved our goal in this post and used DATA conversion control successfully.

I hope you feel this post useful.

Thanks for reading this post.

Enjoy !!!

RJ