Showing posts with label SQL Server Integreation Services. Show all posts

Saturday, October 17, 2015

Step by Step SSIS–Union ALL Tip # 119


Dear All,

In the series of  zero to hero SSIS series this is one of the simplest transformation control which known as UNION ALL. 

As you might aware UNION in general term  which means collective. In SSIS UNION all control is doing the same task.

It collect all the inputs may be of same type of sources or different type of sources and  union them all and provides single output for the same.

Lets understand this by below example.

Suppose, We have different text files which contain fruits &  vegetables name. Now our aim is to combine all the fruits and vegetables name which exists in these files.

if you see below image you will find 3 files which FruitA (Contains fruit names start with letter A) , FruitB (Contain fruit names start with  letter B), FruitP (contains fruit name start with letter P)

Files Now we need to combine this file using UNION ALL transformation. So follow below step by step

1) Step 1:- Step 1 is simplest step and now you all well versed in this. We need to add a new SSIS package file and drag drop  data flow task .

2) Step 2:- Now add different flat file source for all the 3 files and configure all the 3 files  fruitA.txt, fruitB.txt , fruitP.txt .

3) Once we configured all the 3 flat file sources, We have to drag drop UNION ALL transformation control.Once we drag drop UNION ALL we can provide the output of all the 3 files as a input in UNION ALL control as shown in below  figure.

source

Step 4:- Now, we have to configure the UNION ALL control. To do this right click on UNION ALL control and click on EDIT option. Here we have to configure all the columns which we need to union.

ConfigureUnionAll

Step 5:- Once the UNION ALL is configured our next step is to get the output of UNION ALL in a resultant file. for this we have to drag drop destination flat file control as shown in below figure.

file

Step 6:- Now we have to configure the flat file destination and save it to specific location. A part from this we have to provide input to flat file destination which will be output of UNION ALL control. As shown in below figure I am saving the file on same location and giving name finaloutput.txt

finaloutput

Step 7:- Once all the above step is processed by us the final step is to run the package for this just click on RUN icon or hit F5. If everything is working fine the we will get following  result with all the green right check images.

finaloutputREsult

If you see above image we did union of all the 3 files and saved output in a single file.

Now, for learning purpose and to make the post simplest I use only same type source you can use different type of source and destination as per your need.

A part from this UNION ALL doesn’t remove duplicate so if there are duplicates in the files it will not remove.

I hope this article will help you somewhere.  Please provide your inputs.

Enjoy !!!

RJ!!!

Saturday, September 12, 2015

How to use SORT control in SSIS ? TIP #115

Dear Friends,

In the series of Learn SSIS step by step this is the 5th post. Now from this post we are going to use each transformation control one by one.

So, lets start with simplest one transformation control which is “Sort”.

By the name it is clear data it will sort the data which is provided to it and give sorted output as a result. Lets understand this by below step by step example. (Here I am not writing step to start visual studio and create a new project, I am pretty much sure you are aware of this now.)

Before going further let me tell you want we are going to do  here. We will have a input result (which will be a text file) and then sort it and save in another file.

Step 1:-I renamed package to SortPackage if you want you can rename your package as well. Now drag drop a Data Flow task as shown below and double click DATA flow task

Step1

Step 2:- When you click it you will get a data flow screen where you can drag drop FLAT file source. You can choose source assistance as well. Now configure this flat file source. Means give the path of the file which you want to have as a input source. I am taking a text file which contain fruits name in different order. as shown in below figure

Step3

Right click flat file source click on EDIT option and follow the screens

Step4

Step 3:- Now once the file is configure. We have to drag drop SORT control from SSIS tool box as shown in below figure.

Step5

I also added the output of flat file source to sort control. As shown in above figure. Now configure it. Click on Sort control and you will get following screen. As show in below screen you can sort the data on any column and in any direction like Ascending or descending.

Right there is only one input column which is name so we are sorting name in Ascending order as shown below.

Step6

Step 4:- Now once this configuration is done we will save the data in new file with new name which will be sortedFruits. Now to achieve this drag drop the destination control. So I took same float file destination as shown in below figure

Step7

Step 5:- Now configure this file destination. Which means where we need to save this file and what are the columns which we required. so In current case there is only one column which is Name (Fruit name) and I am saving this file at same place with sortFruits name. so lets configure it by clicking right click on flat file destination and click on edit button

step8

Step 6:- Once this is configured we need to run this package by pressing F5.When you run hit F5 and everything going right then in execution screen at each step you will find green right check image as shown in below screen

Step1.JPG9

Step 7: Now to cross check we will first see whether that file is created or not. If created then whether we have sorted data or not. So lets open the flat files.

result

So, if you see at provided destination location a file is created and the data inside this file is sorted file.

I hope you like this first transformation control. till then Enjoy!!!

Thanks !!

RJ!!

Saturday, September 05, 2015

How to deploy SSIS Package ? Step by Step SSIS TIP #114

Dear Friends,
In last post we have successfully created our fist basic package. So, Now the next thing is how to deploy this package.

We have created this package for someone else or our client so we need to run this package on his /her machine.

For this we need to know how to deploy. Lets start this step by step 

Step 1:- Open the existing solution and right click on the solution you will get following options as shown in figure. You need to click on “Convert to Package Deployment Model”   as highlighted below

convert_To_Package

Step 2:- Once you click it you might get popup for confirmation just click OK.

Package_model_cofirmation

Step 3: Now click on Properties you will get following screen in which you need to select the deployment option. And need to select true value for CreateDeploymentUtility as highlighted below in figure. Once You make this option true  press OK or Apply Button.

Properties 

Step 4:- Once you done with this again right click on the solution and again click on Covert to Package deployment model.  Now this time you will get Wizard screen as shown below. Click on Next button

Convert_Wizard_1

Step 5:- You will get below screen which is package selection screen. (Suppose you have multiple packages in a solution so for which package you want to create deployment you need to check / Uncheck according to your need.) Once you selected the Package click on Next button.

Wizard2

Step 6:- When you click next button you will get next option which is specific project properties as shown below in screen. In this we have an important option which is Protection level. It is use to set the level of showing sensitive data in package. for example a package may contain sql server connection string in which we have username and password and username and password are very important and sensitive information. Here ,with protection level we have option to encrypt this sensitive data or make package password protected. This will be an interesting topic which we will discuss separately in near future in separate post. for current time being just leave the default option as is and click on next button.

wizard3

Step 7:- When you click on next button you will get following screen. This is the screen where you can call another package which this deployment. We will discuss it later for current deployment process we don’t want to call any other package.  Just click on next button.

wizard4

Step 8:- When you click on next button you will get following screen which says about configurations. We can create a configuration file which is just a simple XML file. If you are a .NET developer just assume it web.config file where we can keep connection string or other configurable item.

wizard5

Step 9:- We can create parameters which can be use to pass the values in packages. In current solution we have not configured even parameters so don’t think to much about this currently. We will discuss it separately in coming post.

wizard6

Step 10:- Now directly jump to Perform Conversion and skip review step. and click next you will get following screen of popup. Press OK and then try to rebuild the solution.

wizard10

Step 11:- We did  a build/rebuild to cross check package is correct. Now open the deployment folder in bin folder (You can find the address in step 3’s screen) . When you open the folder you will get two files one is Your package file with DTSX extension and another one which is called manifest file as shown in the figure below. Below ExportSQLToFlatFile is our manifest file  and Package is our actual DTSX package file. (if we have config file then you will find config file as well)

Package_Manifest_Location

Step 12:- Now, we successfully completed our first part of deployment which is basically creating a package deployment file which is a manifest file. We can copy these files on any server where we need to deploy the package. When you click on Manifest file which is ExportSQLToFlatFile you will get following screen

Actual_Deployment_1

Step 13: Click on Next button when you get above screen you will get following screen which shows 2 options of package deployment

1) File System deployment 2)  SQL Server deployment

Now for current demo we are using file system deployment and clicking next button.

Actual_Deployment_2

Step 14:- When we click next button we get the screen which ask for folder where package will be deploy by default it is SQL SERVER’s DTS package folder so let it be currently and click Next button

Actual_Deployment_3

Step 15:- After clicking next button , we will get following screen. Which is a confirmation screen for deployment.

Actual_Deployment_4

Step 16:- Now the last step click the finish button and we are good to go.

Actual_Deployment_5

So all the above steps are for creating a deployment for package and then deploy in SQL SERVER. Now , I am sure your next question will be what now ?

So, now we call this Package in SQL SERVER Job and configure job which execute this package time to time.

We, will discuss it more in detail coming post.

I hope you will like this post. please do post your inputs.

Thanks

Raj

Saturday, August 29, 2015

How to create first basic package with SSIS ? tip #113

Dear friends,

In last post #112 we understood WWH (What ,Why & How ) of SSIS. Now , lets move now real quick in practical session where we will try to create a basic simple package.

The example which we are creating is well known Export data from SQL SERVER to a flat file.

Step 1:-  Open SQL SERVER Data Tool from start menu
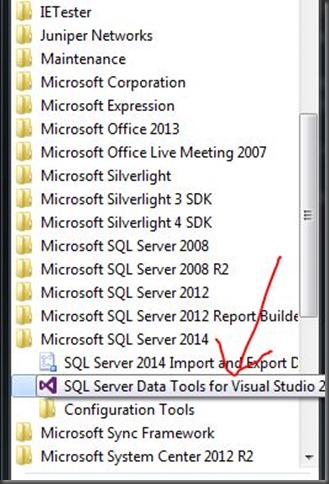
Sql_server_data_tool

Step 2:- Once it is open create a new project by clicking new project option. You have to select proper template as highlighted in below figure and give a name to project. As shown in below figure

SSISCreate_Project_Indiandotnet

Step 3:- Now drag drop data flow task control from SSIS toolbox. You can give customize message by click control’s text. I prefer this habit so down the line if  after few month or years if you need to do some maintenance or logic change you don’t need to think a lot for why this control is for.
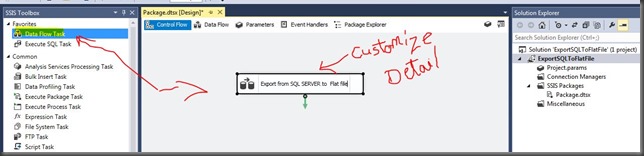
DataFlowControl_indiandotnet_1

Step 4:- Now double click on Data flow control or click on data flow tab. Now on this area you have to drag drop source assistance. When you drag drop it you will get a pop as shown below.
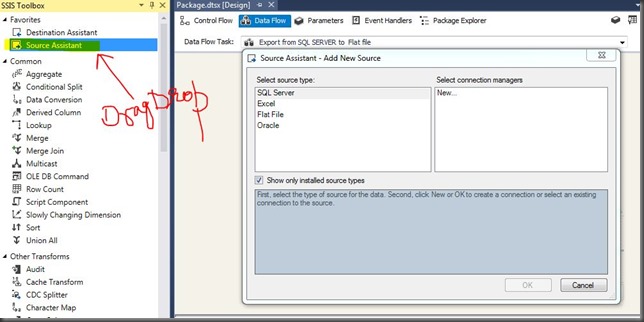
Source_Assistance

The screen source assistance is the way by which we can select the data source on which we need to perform operation.  As you are seeing in the image there are different data sources

Like SQL SERVER, Excel, Flat file, Oracle.

Although, you can select other sources also from SSIS toolbox as shown in below screen (As you are seeing there are various individual sources exists in toolbox itself so either use source assistance or drag drop individual source.It is worthless to explain here that excel source for excel file, flat file source for flat file and so on.
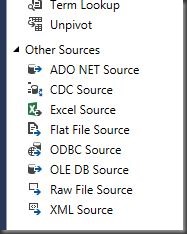
OtherSource

In this example we are selecting SQL SERVER. When you select Source Type then you have to configure connection Manager.For this we have to select “NEW” in connection manager panel and click OK button.

You will get below screen where you can give all the information related to  SQL SERVER by which our package can connect with that data source. below I am using my SQL SERVER installed on my machine and using AdventureWorks database as shown in below image.

SQL_Server_Connection


Now once connection is setup. Now we have to export a particular table data in a flat file. but you are wondering which table or data which we are going to export.

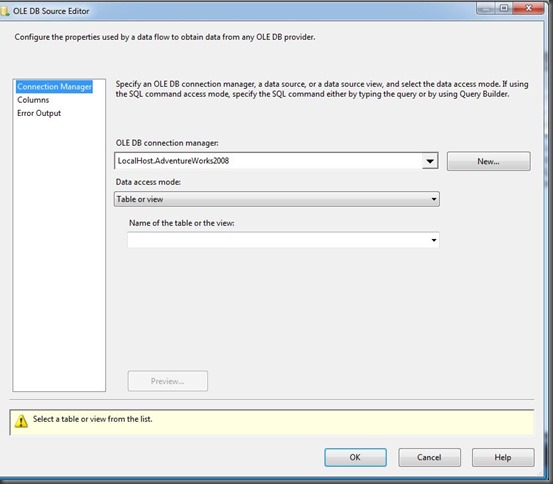
Step 5:- Now to select data which whether it is entire table, or stored procedure output , or view output or just simple SQL query. for this we need to double click on OLEDB data source and then we will get following screen.
OLEB_Data_Source

Now ,here we can choose data access mode either table or view, or SQL command ,SQL command with variable. To make this first example easy we are choosing table or view and selecting “Product table “ in below drop down for Name of the table or the view.

Step 6:- Now once you have selected table or view you can select specific columns which we need to export in flat file. For this we have to select columns option available on left side. when you click it you will get below screen.

Check_Uncheck_columns

As shown in above figure you can check uncheck the columns which you need to export in flat file. we can rename the column name as well (as I did standard Cost to MRP). If you see below image

SELECTED_Columns

Here I am not explaining errorout option in detail in general sense just think it is configuration step if something failed.

Step 8:-

Now, we have source which we need to export in flat file, for this we may require a destination file in which we can store the data. So, Now we drag drop destination control which will be a flat file destination control as shown in below figure.

FileDestination

Step 9:-  Now in above image you are seeing there are 2 arrows which is just flow direction means where the data needs to flow. Obviously in our case the data needs to flow from oledb source to flat file destination. So what we  need to do drag the blue arrow and release it on flat file destination as shown below.

DataFlow_arrow


Step 10 :- I don’t know whether you noticed or not but let me tell you here. If you see above figure data is flowing from oledb source to flat file destination which is good but on same time there is cross image in red color which means there is some error in the control. So guess what is the error ?

I think you picked right the destination is not configured. So to do this we need to double click the flat file destination.

Step 11: When you double click you will get below screen. In which you need to configure the file location and file format like whether you want a delimiter file, fixed length file and many other option as shown in below figure. In our example we are using delimiter file option.

flatFileOption

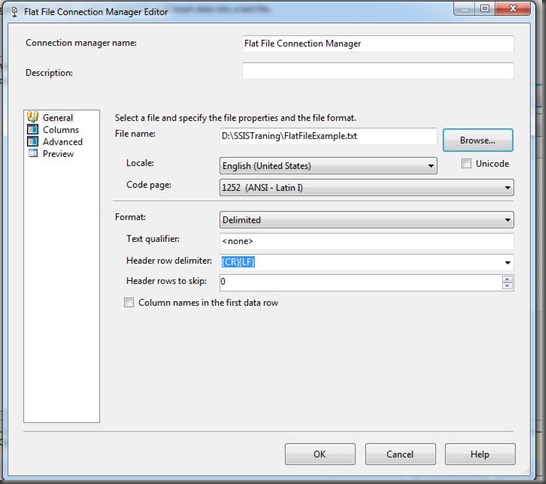
Step 12:- When you hit OK you will get following screen where you need to configure as shown in below figure. You need to give file location with file path. if you want different delimiter the you can choose that also.
FlatFile_Detail

Step 12:- Now press OK you will get flat file destination editor in which you can select mapping option and just check it for your query whether all the selected columns from source are aligning or not.

Mapping

Step 12:- Once we done with this you will see the cross image in red disappear. If you are still seeing this it means there is something going wrong with configuration.

Now if everything is good then we can run our first own created package by pressing F5 or with Start option in IDE.

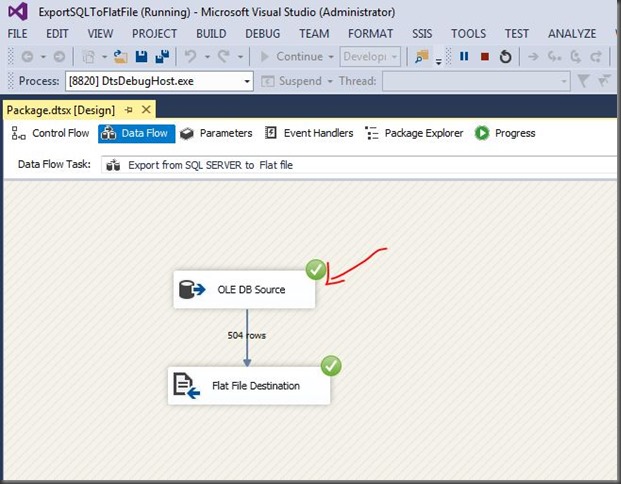
Step 13:-  If everything is correct you will get right check in green apart from this you might be interested how many rows transfer from source to destination so that information also can be found. see below image for detail.
RunPackage

In our case we moved 504 rows. Now lets cross check at the destination location as well whether the file is created or not with these 504 rows.

resultFlatFile

WOW , we did it . We created our first simplest package which is export data from SQL to flat file.

I hope you enjoyed the learning. In next step we will do something more advance. mean while I request you all to do same practice and try to use excel instead of flat file.

Please do write your inputs. Let me know whether you are enjoying this series or not.

Enjoy !!!

RJ!!!

Saturday, August 22, 2015

WWH in SSIS ? Zero to Hero in SSIS series TIP#111

Dear Friends,

As shared in last post Post #110, We are starting SSIS tutorial series ( A Step by Step  SSIS learning tutorial) from today.

Before starting anything we might have some questions like What is SSIS ? Why SSIS ? & How to use SSIS ?

In general term I called this “WWH” What, why  How ?

So, the straight forward answer is SSIS is SQL SERVER Integration Service (a Microsoft tool). It generally comes with SQL Server license. Although It is not always mandatory to have this SSIS tool with SQL Server license, You can install it standalone as well. SSIS is a ETL (Extract Transform loading) tool. We can can use SSIS with IDE which provided by Microsoft.

Now, I understand this is too straight forward and we are not able to digest easily. Let me explain it with an example.

I am leaving in Indore a city reside in Madhaya pradesh a state in the heart  of India. Suppose the Chief Minister of MP allocated some funds to Municipal corporation of  each cities like Indore, Ujjain, Bhopal etc. to do whatever best they can do with money and make their city a better place.

After few years The Chief Minister realized and thought let’s ask each cities how they utilized the money. What are the different areas on which they have work with the provided money.

The chief minister wants consolidate reports (which we generally called MIS reports) as well as some detailed reports.

Now, suppose different municipal corporations using different ways to restore data like Indore municipal corporation using Microsoft SQL SERVER, Bhopal municipal  corporation using ORACLE, Ujjain’s municipal corporation using  MYSQL, Devas municipal corporation using flat file system.

So there might be different heterogeneous systems used to maintain the data and data would be on different verticals like Transportation (Road & Bridges), Water harvesting (River  & tanks) ,Agriculture , lighting etc.

To grab this entire data & consolidate them in one single database and providing the reports to Chief minister so that he can analyze which city doing progress , which city consuming money , how much work done in different vertical so that , he can take further decisions.

I hope you understand  a big problem here which is gathering data from different heterogonous resource & compile them and provide a unique data base on which reports will create is a big task which can be easily done by an ETL (Extract Transform Loading) tool which is SQL SERVER Integration Service Tool.

Here Extract means extract or fetch data from different resource or data source whether it is SQL SERVER, ORACLE, MYSQL , Flat file or any other source

Transform means converting the data in to required single format

Load means prepare the data and provide final output.

Below is the image which illustrate same thing which we discussed earlier in this post.

ETL_First_image_By_Indiandotnet

So , I hope you understand the SSIS (ETL) role here.

Remember here SSIS use here to provide the data only rest work will be done by SSAS (SQL Server Analysis Services) and SSRS (SQL SERVER Reporting Services)

In this post we got 2 answers 1) What is SSIS ?  2) Why is SSIS? we will see How to use SSIS in next post.

Till than

Enjoy !!!

RJ !!!