Showing posts with label ASP.NET 4. Show all posts

Wednesday, April 15, 2015

LESS but it is more–CSS Preprocessor with ASP.NET


Now a days a “ CSS  pre processor “ is a very famous buzz word.  Although I am a web developer but still I am not always interested in writing CSS  don’t know why.

When I heard about css pre processor then I was curious to know what it exact about.

So let me share my thought here about CSS Preprocessor.

So a  CSS pre processor is a way to extend the CSS language and variables, functions and programming  stuff.

As a developer you will be more happy to have pre processor because it allows you to write code and also reduce the amount of css up to some extent.

There are many CSS  pre processor are exists in the market  like LESS, SASS,

Stylus,clay and many more.

Now Let me share here how to use LESS.css in your ASP.NET code.

Step 1:-  Add  Nuget package Less.js

Less_Nuget_Package

once you added this package in your script folder you will get 2 new java script file with prefix less as shown below in figure

Less_Script

Step 2:- Now right click on content folder and add a new item which is LESS style sheet. This file will have extension .less


Less

Step 3:-  Now you can write your LESS related code as shown in below snap

lesscss

If you see above snap I declared  variable like @back-color , @font-color etc

and used in body.

Step 4: Now  add a web page and write following lines to enable LESS css.

<link href="Content/MyLessCss.less" rel="stylesheet/less" />
   <script src="Scripts/less-1.5.1.min.js"></script>

Test_Less_Page

step 5:- Now in web.config we need to add following mime type

Webconfig_less

Or you can add this from IIS.

Step 6: Now we are good to go and can run  it

sample_Less__page

So we get the color according to variable which we declared.

It means we can play with the variables and can write the less code in programming way.

I hope this post will give a step to go further and I am sure you will deep dive in CSS pre processor soon.

Enjoy !!!

RJ !!

Thursday, December 25, 2014

How easy to reduce efforts in retesting a asp.net web application?


Most of the time when you write code for a web application you need to test it again and again. You have to run a whole flow of positive or negative test cases to check whether your application is working or not.

Now suppose your application have 20 pages and you need to traverse each individual page and may be perform some operation and on each change of your development you need to perform same thing.

sometimes, this thing will irritate you and you will skip testing which may be harmful because most of the time it happens when you skipped something Smile you took a deep breath  and at that moment your application crashed Sad smile.

So , as a responsible developer we do not have to skip any test scenario but next question is how to reduce this effort which you feel boring sometime.

I can say we can reduce this effort by a installing a simple  Firefox add-in which is absolutely free. The add in “Selenium add in”

you can download it from https://addons.mozilla.org/en-US/firefox/addon/selenium-expert-selenium-ide/

once you have installed this you will find the selenium icon near by search bar as shown below

selenium_icon

when you click this icon you will get a selenium interface as shown below

selenium_interface

The basic concept of this tool is what ever you will run in browser it has capability of recording those steps so it is just play button and pause button game, no rocket science. You can easily run and use this.

I am sure it will reduce your testing effort and when when selenium ide will play your test cases you can take a deep breath and enjoy your coffee and snacks.

I hope this tip may be helpful to you somewhere.

Happy Holidays.

Regards,

RJ

Tuesday, December 02, 2014

MVC from Beginner to advance session by Indiandotnet


Dear All,

Thanks for attending session on 30th Nov 2014. I would like to say a big thanks to Abhishek Sapkale also who delivered the session and share knowledge with us.

We tried to  do go live in this seminar and some people joined also and enjoyed the live streaming.

Those who were not able to attend the session due to some reason, they can see the videos of session from below links

https://www.youtube.com/watch?v=gDYLJrOUJ7w

https://www.youtube.com/watch?v=UIPauB1Ixzc

https://www.youtube.com/watch?v=UIPauB1Ixzc

You can also watch presentation at slide share


I hope it might help you.

Thanks

Rj !!!

Wednesday, September 24, 2014

How to resolve “No Entity Framework provider found for the ADO.NET provider with invariant name” ?


Hello friends,

sometimes you face lot of issue when you trying to deploy the the WCF/Website code which reference another project code in which we have used Entity framework.

We were very happy at the time of development and when we go to deploy it we faced a problem which state that

“No Entity Framework provider found for the ADO.NET provider with invariant name “

When I first time saw this error I thought it will resolve easily few simple configuration changes. I searched on Google and found numerous solutions which state to update entity framework version which I already updated.

Few post state configuration changes in web.config which I did but still same issue.

After sometime I just thought to copy entity framework related all the dll .

And ” Eureka ! “ all is working fine now.

EntityFramework1

Actually EntityFramework.SQLSERVER.dll was not in the folder and after copying this everything is working.

I hope when you this your problem also resolve.

Thanks

RJ !!

Monday, March 31, 2014

Build 2014–2nd–4th April

Dear all,

Its back enjoy build on 2nd & 4th April. Although I am very interested to join and see this great event live at San Francisco but unfortunately Sad smile not able to go there.

I will enjoy video

You can find more detail with below link

http://www.buildwindows.com/

So enjoy learning

Regards,

Rajat Jaiswal

Sunday, March 23, 2014

Sammy.Js–simplest steps to create Restful web application (Single Page Applications) SPAs

Dear All,

Today I  am sharing with you one of the best and easy to understand JS which is “Sammy.Js”.

“Sammy.js” is 16 k java script over JQUERY which provide facility to developer to create RESTFUL SPAs (single Page Application).

It is very  clean, simple and easy to adapt java script.rl

You get Restful URL easily with this.

It added “#”  hash in URL. For example see below example

http://Indiandotnet.com/index#/

http://indiandotnet.com/index#/Products/

http://indiandotnet.com/Index#/products/1

Let us understand this with example.

In last post you have seen how to consume web API with JQUERY http://indiandotnet.wordpress.com/2014/03/21/how-to-consume-web-api-using-jquery/

Here I am using the sample source code to move forward with sammy.js.

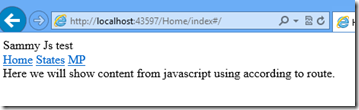
What we are planning here to create a page with menus and in this page we will call sammy.js on menu to call responsive URL to show states list ,particular state according to id and default page . as shown in below figure
Html_Sammy_Js

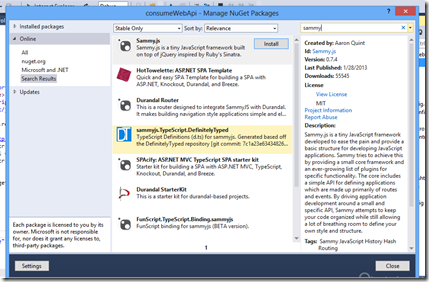
Step 1:-  Add “Sammy.js” in the project using Nuget package manager as shown in below figure
sammyJs_Nuget_Package

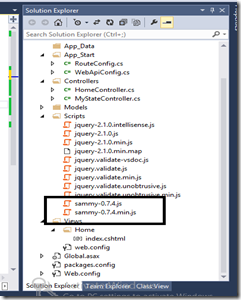
Step 2:- Once the Sammy.Js added in your project you will find the Js in your project’s script folder
sammyJs_in_project

Step 3:-

Add sammy js reference in the project

   1: <script src="~/Scripts/jquery-2.1.0.min.js"></script>
   2:    <script src="~/Scripts/sammy-0.7.4.min.js"></script>

Step 4:-


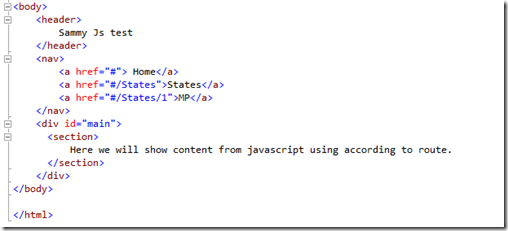
Now below screen shot show the html which is designed to achieve our task

Default_Html


Step 5:- Now when Home menu link click by end user we will show  default page which in Index page in our case and its URL will be


http://localhost:43597/Home/index#/ 


And when user click on States link in navigation then it will show URL


http://localhost:43597/Home/index#/States 


And page will show list of states


last but not the least when user click on MP menu in navigation  then it will show URL


http://localhost:43597/Home/index#/States/1 


and page will show state name according to Id which is currently 1 in above url


Step 6:-


Now to achieve this we need to invoke Sammy.js  as shown below in below code


   1: <script type="text/javascript">
   2:  
   3:       $(document).ready(function () {
   4:           var sammySPA = $.sammy("#main", function () { // initializing main div which is base for SPAs application content 
   5:  
   6:               //Default url  
   7:               this.get('#/', function (context) {
   8:                   
   9:                   context.app.swap(''); // clear what ever previously written in main div
  10:                   $("#main").append("<B> Showing default url content by code</b>"); // this code append the content in msin div 
  11:  
  12:               });
  13:               //below code will fire when user click on state link 
  14:               this.get('#/States', function (context) {
  15:                 
  16:                   //calling the Web API to provide State name array 
  17:                   $.get("http://localhost:43597/api/mystate/", function (data, textStatus) {
  18:                       var str = "";
  19:                       // create list with sate name which again referencing to new url
  20:                       for (var i = 0; i < data.length; i++) {
  21:                           str = str + "<li><a href='#/States/" + (i+1).toString() + "'>" + data[i] + "</a></li>";
  22:                       }
  23:  
  24:                       //Clean the main div 
  25:                       context.app.swap('');
  26:                       //Apeend the data in main div
  27:                       $("#main").append("<ul>" + str + "</ul>");
  28:  
  29:                           
  30:                   });
  31:  
  32:               });
  33:  
  34:               //States/stateId url 
  35:               this.get('#/States/:id', function (context) {
  36:                   //calling web api to get particular state by id
  37:                   $.get("http://localhost:43597/api/mystate/"+ context.params.id, function (data, textStatus) {
  38:                     
  39:                       context.app.swap('');
  40:                       $("#main").append("<h1>" + data + "</h1>");
  41:  
  42:  
  43:                   });
  44:               });
  45:  
  46:         
  47:  
  48:           });
  49:           
  50:           sammySPA.run('#/'); //run sammy.js
  51:  
  52:  
  53:  
  54:       });
  55:   </script>

Step 7:-


Let me explain the above code here


We have define $.sammy function which is bounded with the div whose.


$.sammy(‘#main’,function() {}).run(); this is the basic function to invoke sammy.js


Step 8:- Now to which url we need to entertain by which method like  get, put, Post, delete. We need to define our functionality according to our need in current example we have used get function.


this.get(‘#/’,function (context){});


The meaning of above line is when ever a request (default) invoke by end user just execute function as defined. in the function there is context parameter . Which help in accessing method type (get/post) , parameters


Step 9:-  Now when you run and click on States link you will get following screen
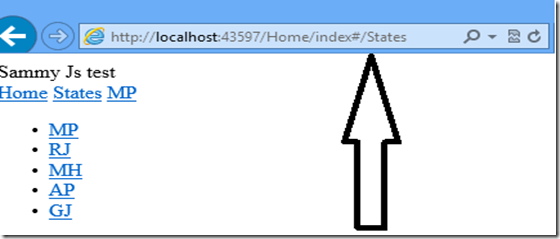

stateResult_sammy


Step 10:- you can test it further I have added list of states also with dynamic url  so when you click on MP, RJ, MH etc in above list you will get a new URL according to our need
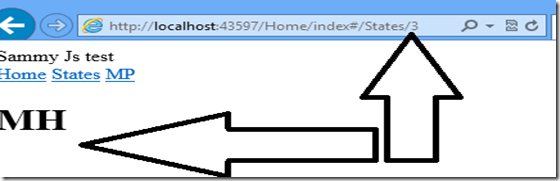

statewithparticularId


I hope this example will help you to create your own SPA application.


I defiantly say here “Sammy.js” rock. I like this script hope you will also.


Enjoy learning


your Host


Rajat

Friday, March 21, 2014

How to consume Web API using JQUERY ?


Friends,

In last two articles we understood

 what is Web API ? (http://indiandotnet.wordpress.com/2014/02/23/what-is-web-api/)

and How to create it ? (http://indiandotnet.wordpress.com/2014/02/27/how-to-create-web-api/)

Now next is how to consume it ?

So here we will understand this by an example. I am pretty much sure you all  are comfortable with server side code so here in current example we using  client side code to consume web API.

In current example I have created a Web API with name “MyState” . The basic functionality of this Web API is to provide list of all the State with default get method and provide specific state according to provided id.

Let me show you snap shots of created code & running API here

Mystate_Code

Above figure shows default get method which response array of string (name of state)

defaultStateResult

Now to consume this Web API in our project we have added a view with following Java script

in below screen we have used a “get” JQUERY function and as we  know the API URL we wrote that and once the response from API returned we concatenated the response array with <li> tag and show as a innerHTML of stateName div as shown in below fig

consuming_web_Api_JQUERY

Now when we run this program on index.cshtml we got following response

stateResult

In current example we have used  “GET” method we can also consume post operation for INSERT/UPDATE/Delete

I hope you will like this post.

Thanks

Your host

Rajat

Sunday, March 16, 2014

How to split entity classes in a separate project from Entity Framework in easy step

Dear All,

Below are easy step to split the entity classes in a separate project. I have created a MVC sample project in below example. Now follow below steps

Step 1:- Add  a Ado.NET Entity Data Model  as shown below. I am using SQL Server “Friends” Database in this example.defaultedm 

Step 2:-

Once EDMX is added I got below structure as shown in below figure. Entities for each table object of Friends Database shown in below fig

defaultedmx

Step 3:- Now as our goal to separate this entity class  I added a new class project as shown in below figure

pocoentities

Step 4:-

Now in this class project add  EF 5.x Db Context Generator  as shown in below figure

newEFDbContextGenerator

Step 5:-

Now  click on Model.tt file in your new class project. Just edit  the Input file  as I edited in below fix you need to give your EDMX Path. 

Like I did “ using string inputFile = @”..\youredmxprojectname\youredmxname.edmx”

changethePathofEdmx

Step 6:-   Once this code is changed delete the all the  entities files from EDMX and rebuild  the project

Step 7:-  Once the file is generated you are good to go  just see as I got the files  in separate class project.


generatedEntities

I hope you will achieve the same with above steps.

So enjoy learning Smile

Your Host,

Rajat Jaiswal

Wednesday, February 26, 2014

How to create Web API ?

Dear Friends,

In Last article http://indiandotnet.wordpress.com/2014/02/23/what-is-web-api/ 

We have discussed what is Web API. Now in this article we will see how to create web API. So with out wasting much time lets start visual studio (In my case I am running VS 2013 web express).

So in my example I am creating a web API project for Friends. this API should return either all the friends or specific friend according to Id so lets start.

Step 1: Create a  new web project when you click on web project you will get following option. Select Web API option as shown in below screen shot.

project-WebAPi

You will get default project as below with defined folder structure

defaultProject

The main point here is to remember Model class should come in model folder & Controller class should come in controller folder

Step 2:- Once you click on Web API option project will open. Now Create a model (a simple class) with name Friend. this model class have basic friend’s property like his firstName, LastName,Id etc. as shown in below fig

FriendModelClass

Step 3:- Now create  a Friend controller so for this just add new item which is controller as shown in below fig

AddWebAPIController

In the above option I have selected Web API 2 controller Empty template

things to remember here the name of controller class will be use later on in your API URL so select the name properly and the controller class name should followed by controller.

In my case I have created controller with following name =”FriendController.cs”. So now your project structure is as shown below

CurrentProject_Structure

Step 4:- Now remember all the coding part need to be done here . I am creating two method here one method with name “GetAllFriends” and “GetFriendById”.

So as name suggest one will return list of all friends and one will return particular friend for a given id. If you see below instead of fetching data from database I have created a array of friends as shown.

ControllerDefinition

Now in above fig you saw two method with different return type. Now concentrate on GetFriendByID It’s return type is HttpActionResult. so if you see below in that particular method the return type is OK which means status code 200. It means http response will be return in this method.

Now another interesting part is you can add different attribute with method like HTTPGET, HTTPPOST,HTTPDELETE etc Just see in below screen shot as shown below.

HttpGetOrOtherAttributes

Now another interesting point is what if you want two attribute on same method then you can use below option which shown “AcceptVerbs”

AcceptVerbs

Step 5:- Now our most part is done now you need to access web API but before accessing web API you need to check route and if something is missing their then you need to modify WebAPI config  which you will get in App_Start function. In my case I have added API/{controller}/{action}/{id} which was not exist earlier. as shown in below fig

WebAPIConfigSettings

Step 6:- Now we are good to go now just run the application and type in url http://localhost:yourport/API/Friend you will get list of all the friends as shown below

FindListOfAllFriends

Now if you want to get specific friend with particular id then you have to write url like http://localhost:youport/API/Friend/1

You will get particular friend with that id as shown below

FindingSpecificFriendByID


Isn’t it simple ?

I hope you understand how easy to create Web API. Now in next step we will learn how to consume the Web API.

Mean while you can create different web api.

So enjoy till than

Your host,

Rajat

Monday, October 14, 2013

How to do 7zip programmatically using C# ?

Dear All,

Some times it may be possible you require to  make zip of  a file or directory.

so here is simple example.

To start it you have to download “SevenZipSharp.dll”, “7z.dll” you can download sdk from http://www.7-zip.org/sdk.html

Once you download sdk copy above 2 DLL in your project bin folder.

Now write below code which i am writing here

   1:  
   2: public bool CompressFolder(String 
   3: backupFolder)
   4:  
   5: {
   6:  
   7: try
   8:  
   9: {
  10:  
  11: SevenZipCompressor sz = new SevenZipCompressor(); 
  12:  
  13: SevenZip.SevenZipCompressor.SetLibraryPath(DLLPath);
  14:  
  15: sz.CompressionLevel = 
  16: CompressionLevel.Ultra;
  17:  
  18: sz.CompressionMode = 
  19: CompressionMode.Create;
  20:  
  21: sz.CompressionMethod = 
  22: CompressionMethod.Default;
  23:  
  24: sz.FastCompression = 
  25: true;
  26:  
  27: sz.CompressDirectory(backupFolder, BackupPath + "\\" + 
  28: DateTime.Now.Date.ToString("yyyyMMddHHmmss") + 
  29: "_7Zip.7z");
  30:  
  31: Directory.Delete(backupFolder,true);
  32:  
  33: return true;
  34:  
  35: }
  36:  catch (Exception 
  37: ex)
  38:  
  39: {
  40:  
  41: throw ex;
  42:  }


Now let me describe the code to you.


This is function which compress the folder to 7zip what ever pass as a paramter


in this function we have created a sevenzip compressor object


SevenZip.SevenZipCompressor.SetLibraryPath(DLLPath);


in the above line we set the DLLpath which is basically your bin folder path


sz.CompressionLevel = CompressionLevel.Ultra; is compress level which can be different according to your need.


sz.CompressDirectory(backupFolder, BackupPath + "\\" + DateTime.Now.Date.ToString("yyyyMMddHHmmss") + "_7Zip.7z");


above row compress the directory of backupfolder and rename with datetime_7zip.7z


I hope this will help you.


Enjoy 7zip.


Thanks & Best Regards,


Rajat Jaiswla